# Quick start
You are 5 minutes away from creating your first NodeScript endpoint.
# Sign up
First, you need a NodeScript Platform account. You can use one of the following methods for signing up:
- Login with Google (OAuth)
- Login with GitHub (OAuth)
- Magic link (the sign in link will be sent to your email)
# Organization
At the first sign in you will be prompted to create an organization.
In NodeScript everything you create is linked to a particular organization. This way you can add more people to collaborate with you.
If you don't need to add teammates yet, just proceed with a Personal organization — you can change this at any time in Organization settings.
# Workspace
Workspaces provide a way to structure your graphs, endpoints, schedules and variables. This becomes especially relevant when you build multiple applications with a single team.
You can create as many workspaces as you want in the organization; however, there are at least 3 things to consider when deciding whether you need a separate workspace:
- Published graphs automatically become the modules you can use in other graphs within the same workspace — but not in other workspaces.
- Variables (including encrypted secrets) are never accessible across workspaces.
- Logs and metrics are displayed separately for each workspace.
When you start out, you have a default workspace already pre-made, so let's use that.
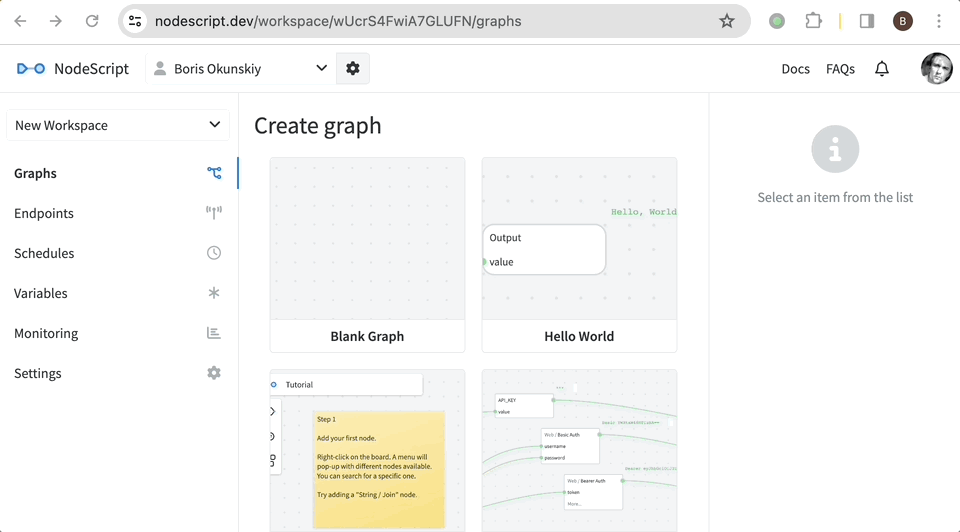
# Create a graph
It's a well established tradition (opens new window) to teach computers to greet people with every new technology.
Let's do the same now.
Go to "Graphs" and click Create Graph, set the graph name to "Hello".
Right click on the canvas to bring up the Add Node menu, add the Output node.
Type "Hello, World!" into the Output node's
valuefield.Click Publish → "Expose via HTTP" → Publish module.
Your endpoint is now ready! Click Publish, copy the URL and visit it in your browser.
# Adding an input
Without inputs our endpoint will always show us the same "Hello, World!" no matter what.
Let's make it a bit more interesting and introduce an input, so that it would greet a person with a specified name.
Click the Inputs button → Add input.
Specify
nameas input name → choosestringas input type → Add input.Next, right-click on the canvas and add an Input "name" node. This node will hold the value of our input.
With the Input node selected expand the input and type in a value (e.g. your name). Notice how this value appears as an outcome of the Input node.
Time to assemble our greeting. There's a number of ways this can be done, but we'll go for String / Join for this demo:
- Right-click → add String / Join.
- Click + button next to
strings— this will add another line where you can type text or connect the value of another node. - We need 3 such components overall, so click + two more times.
- Now fill them in:
- type
Hello,into the first line - plug the
namenode into the second line - type
!into the third line
- type
- Notice how the result of String / Join changes as you type and tweak the values accordingly.
Now plug String / Join to the
valueof the Output node.Finally, click Publish and then Publish module one more time.

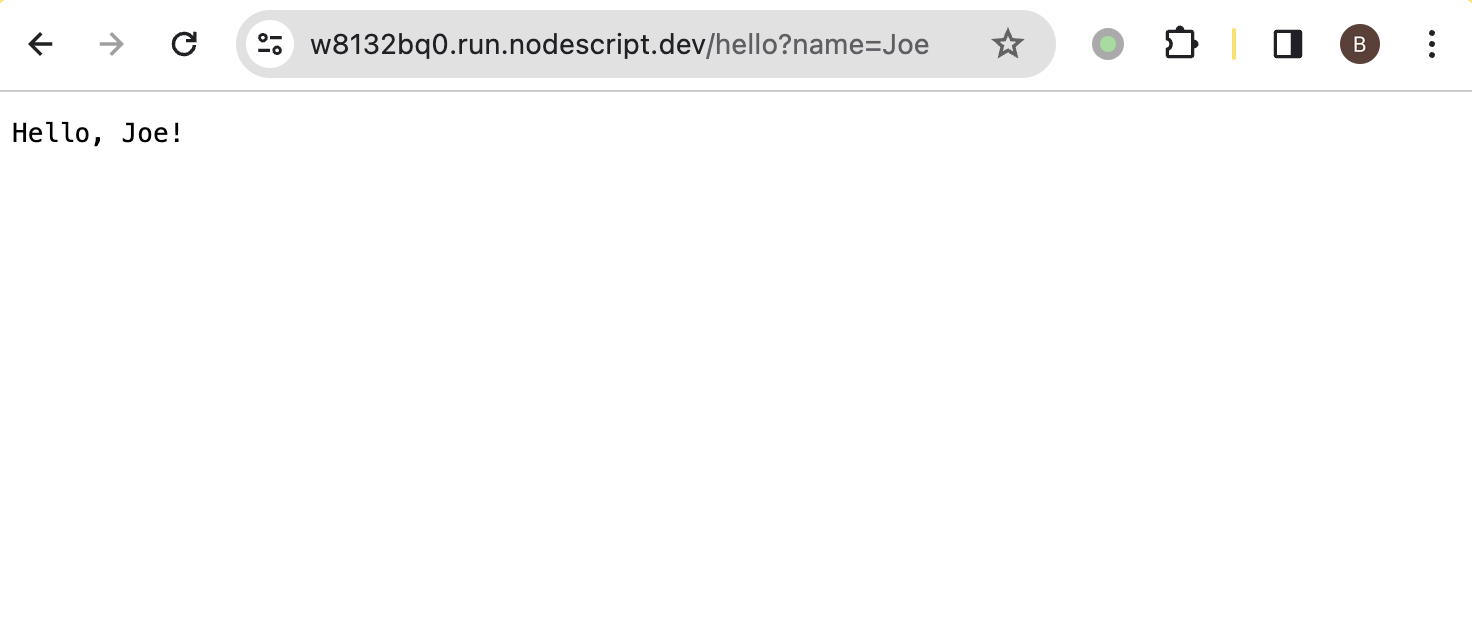
Now open your endpoint in the browser again, but this time add ?name=Joe to the URL. The result should look like this:
Great job so far!
Make sure to check out our bite-sized tutorials to learn more NodeScript fundamentals.